
As this is my first blog post I thought I thought I would play it safe and talk about something you will all love. I recently up-cycled a chair for a hairdressing salon I have been redesigning, I posted my progress on Instagram and got a huge response to it so I thought I would show you how affordable and easy the project was.

My client didn’t have a huge budget for furniture as we were doing the whole salon. She wanted a vintage style waiting area with comfy attractive chairs with maximum seating capacity.
She asked me to source some vintage style ‘quirky’ chairs that would be functional as well as look cool. I began searching and very quickly found a fabric buttoned tub style chair in a rather dated worn rose pink fabric. After securing the price for a bargain£20, I packed it off in the boot of my car and took it home.

Already I knew what I wanted to do with it and after explaining to the client I got the go ahead. As I’ve said before, I fully endorse chalk paint. It is a fantastic product that can be used on pretty much any surface including fabric, without the need for loads of prep (which I love). Many of you might be surprised that you can paint fabric, but honestly its very easy and the resulting finish after its waxed is almost leather like.
So after agreeing a colour I set about the transformation. I will write this as a step-by-step guide so it’s easy for you to follow.
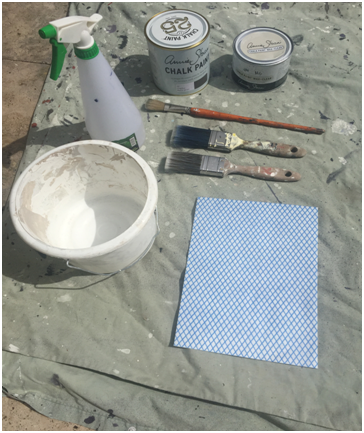
Firstly you will need
The fabric chair you would like to paint
1 liter pot of chalk paint (I use Annie Sloan) in your chosen colour
A small pot of clear furniture wax (again I use Annie Sloan)
2x 1.5” paint brush
A smaller (0.75”) long handled brush for getting down into crevices
An empty paint kettle, or a Tupperware pot or large jar
A cheap plastic water spray bottle like one you would use for spraying plants etc.
A jay cloth or an old sock or pants (preferably clean!) for removing the excess wax
A dustsheet
Ok so you have your chair and your equipment and you are ready to go….
Step 1
Lay your dustsheet out with your chair on top, I like to do this outside, but that’s just me. Next just give your chair a little sweep over to make sure there is no dirt in the crevices of the fabric.
Step 2
Get your water spray bottle, fill it with water and start to spray the fabric of the chair. You will need to make sure its thoroughly damp all over but not saturated.

Step 3
Give your unopened paint tin a good shake, then crack it open and pour a bit of the paint in your paint kettle, Tupperware pot or large jar. Add a bit of water and mix until it is the about the consistency of double cream. Maybe a bit thicker even because you can always add more water as you go.
Step 4
Next using your 1.5” brush, start applying the chalk paint onto the fabric of the chair. You don’t have to be too neat or precious with you brush strokes, chalk paint has a very forgiving quality to it. The paint should absorb quite easily into the fabric, if it feels too stiff and you have to work it a bit, and then maybe add a little more water to the paint. Or likewise, if its too sloppy and you are making a right mess, than add a little more paint to the mixture. Remember to keep spraying your fabric with water a little so it stays damp. If like me you are doing this outside in the sun (any excuse ;-) , then the fabric will dry out pretty quick so you will need to keep spraying as you go.
Step 5
Make sure the whole of the fabric is covered with paint. Next use your thin long handled brush to push the paint right down into the crevices. Wriggle it into any pleats or around button gatherings.
Step 6
Let this coat dry and make yourself a cuppa while you wait.

Step 7
When the paint is dry give the chair another misting with your water bottle and start applying second coat of paint, repeating steps 4 and 5 again. When finished, leave to dry.
Step 8
When the paint is dry the fabric feel crisp and rough. Don’t worry about this, as the wax will soften it. So next, get your other 1.5” brush and your pot of clear wax. Open the pot and with the brush start to apply the wax, almost pushing it around on the fabric in all directions. Make sure the fabric is fully covered in the wax and leave it for 5-15 mins.

Step 9
Using your cloth, sock or pants, rub or buff the whole of the fabric of the chair, this will help to remove any excess wax. Now leave to dry and the wax will start to harden over a few hrs. Another coat of wax can be applied, but it’s not really necessary if you have thoroughly coated the chair. Make sure you clean all your brushes thoroughly and use a bit of washing up liquid to remove the wax.
And that it. Done! You can if you want like I did, do things like paint the chair legs in Chalk paint and add gilding wax onto moldings or edges. Just remember to wax the chalk paint first and apply the gilding wax after.

So there you have it, a beautiful vintage looking up-cycled chair for a little bit of effort and not much cost.
Alternatively, if you find this all a bit of a faff, then I offer a bespokeup cycling service. Hop on over to my website and email me.
